webShaper AutoCount Accounting Sync is an accounting software aimed to sync product to webShaper.
Prerequisites
Product Installation
Initial Setup
Settings
Please follow this step by step instructions:
Step 1: Choose Items To Sync
Step 2: Manage Item Details
Step 3: Sync Stock
Step 4: Order Sync
Prerequisites
1. AutoCount Accounting Software – Download Here
Product Installation
1. Install webShaper AutoCount Accounting Version 1.3.
2. If windows prompt you to allow the installation of the program, allow it.
3. An icon to the application should appear on your desktop and your start menu.

4. The application should be in the startup folder to start automatically when windows starts.
Initial Setup
1. Open AutoCount Accounting Software. Fill in User ID and Password. Click Login.
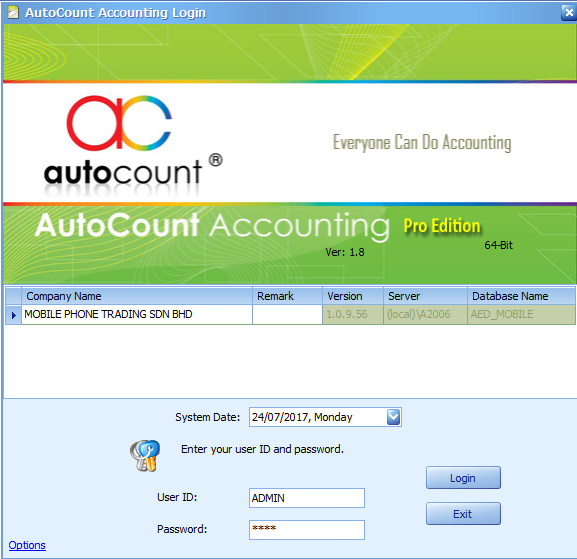
2. It will direct you to AutoCount Accounting Software main page.

Settings
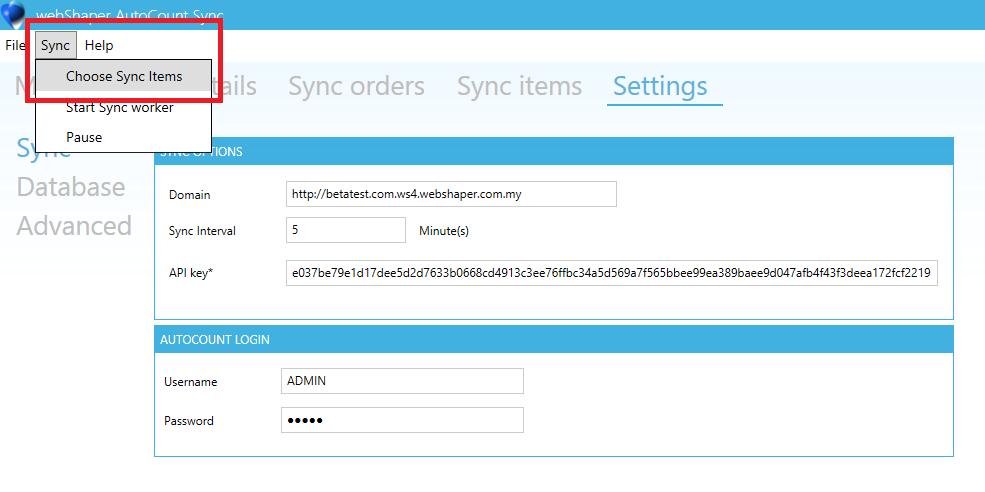
1. Set Sync Options
i. Click Settings > Sync.
ii. Set your Domain (webShaper Store URL).
iii. Set Sync Interval (in minutes).
iv. Paste your store API Key.
To get your store API Key, you can copy from:
- Go to your store control panel.
- Click Settings.
- In Store Settings section, click API.
- Copy your API Key from there and paste it.

2. Set Database Connection
i. Go to Settings -> Database.
ii. Inside AutoCount Database Connection checkbox, enter:
- Server
- Database Name
- Authentication Type (Windows @ SQL Server)
iii. Click Test Connection and it should state that Connection Established!.

3. Initialize Database
i. Go to Settings -> Database.
ii. Make sure the parameters for the database are correct.
iii. Click Initialize Database.
iv. Then it stated that its done and you can continue to create items in AutoCount Accounting.

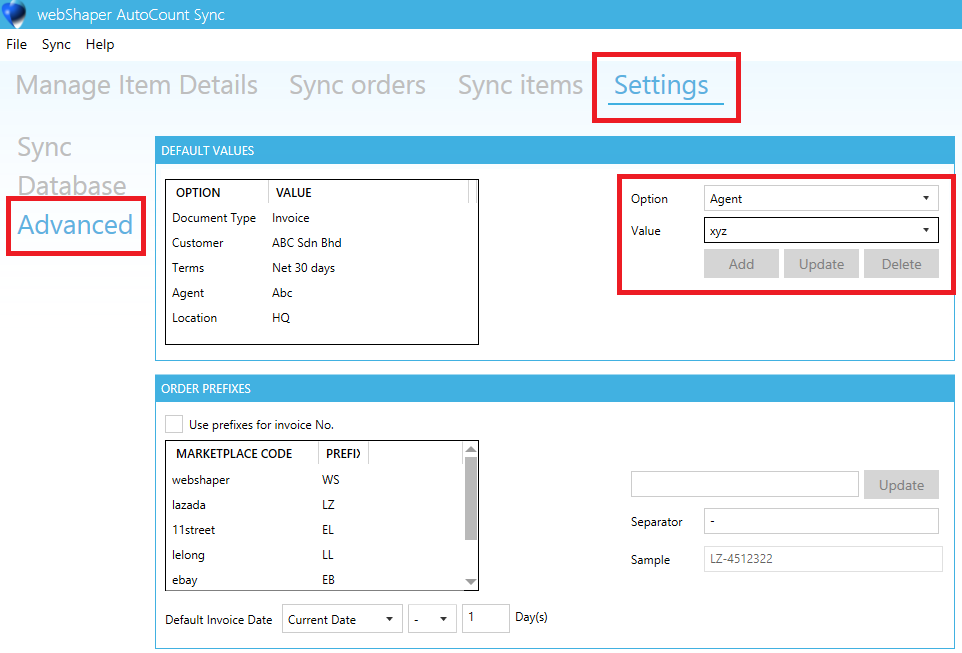
4. Setting Default Values
i. Go to Settings > Advanced.
ii. Select an Option from the default values group which are:
- Agent
- Terms
- Customer
- Location
- Document Type
iii. If the selected option does not exist in the default values, you can Add it.
iv. Select a default value from the data grid, you can Update or Delete the selected option.
*Note: If you set your location in webShaper AutoCount Accounting inside Advanced Settings, this will require Multi-Location Stock module. Which means:
i. Stock items shown will be filtered from this location.
ii. Sync Orders will be sync to this location.
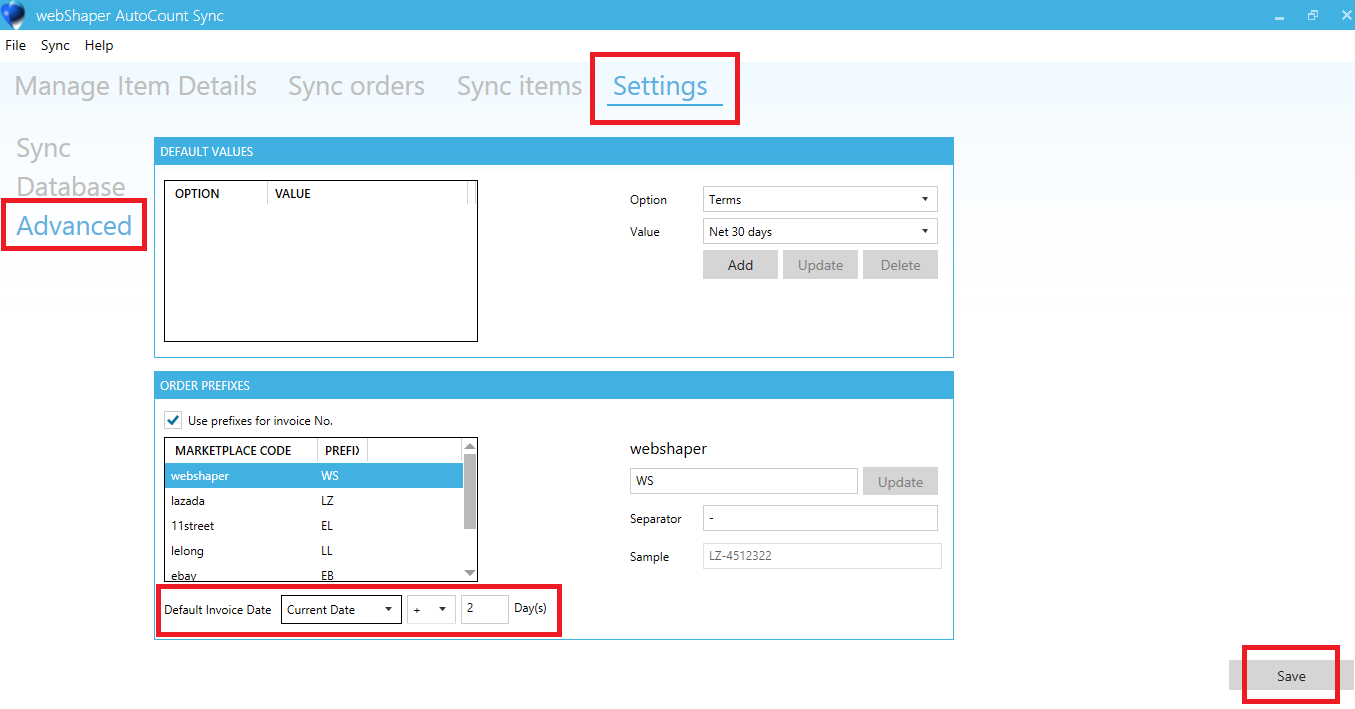
5. Setting Prefixes For Marketplaces
i. Go to Settings > Advanced.
ii. Choose to use Prefixes and change the values of marketplace codes prefixes.
iii. Click on one of the prefixes and change the value.
iv. Press Update.

6. Set Default Invoice Date
i. Go to Settings > Advanced.
ii. Change the default invoice date to either Current Date or Order Date.
iii. You can add or subtract a certain amount of days.
iv. Click Save.
Step 1: Choose Items To Sync
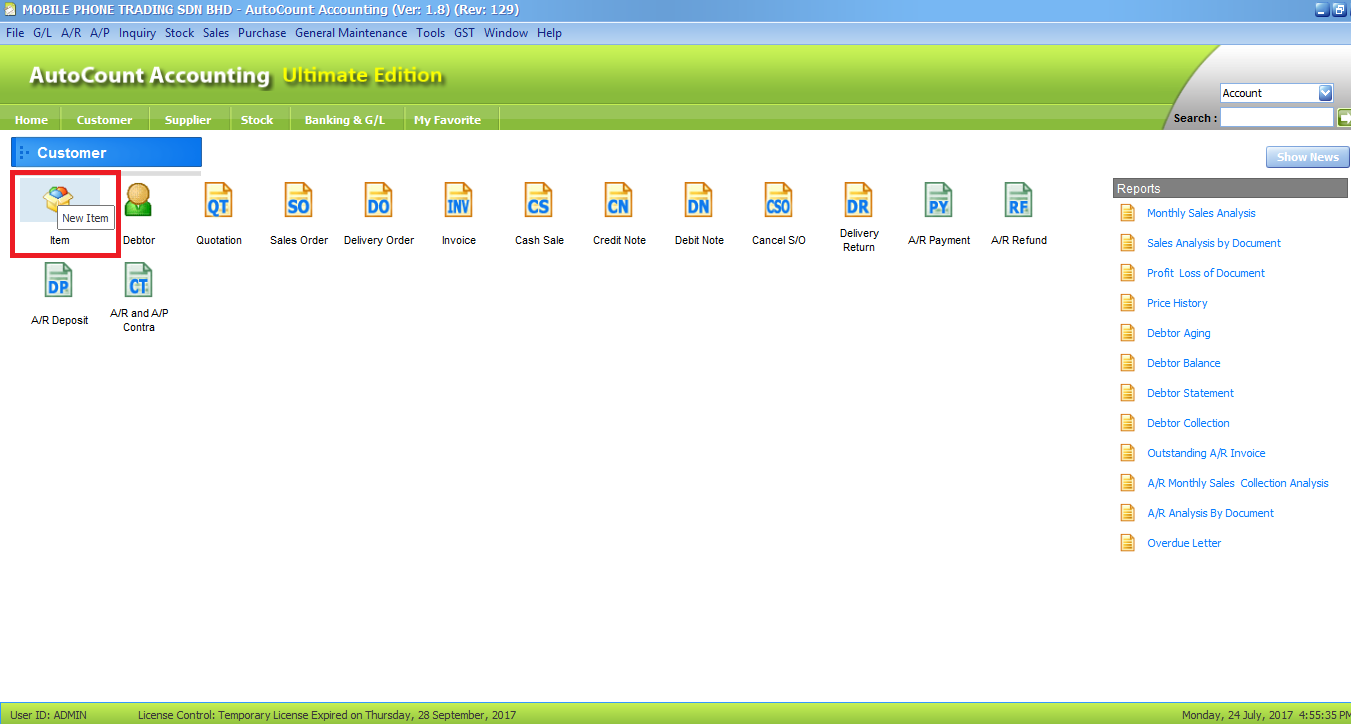
Before you choose items to sync into webShaper, you have to create a product.
i. Open your AutoCount Accounting Ultimate Edition.
ii. Click Item under Customer section.
iii. It will direct you to New Stock Item page. In here you can you can create new item and fill in all the description.
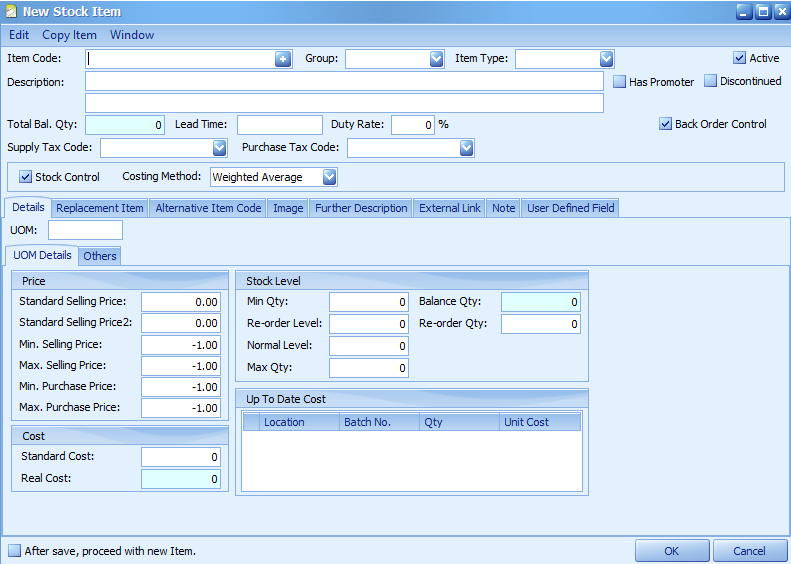
iv. Insert your:
- Item Code: Item SKU
- Description: Product Name
- UOM: Unit Of Measurement such as pieces, units or kilograms.
- Price: Price Shown To Customer
- Cost: Original Price
- Stock Level:
v. Click OK.
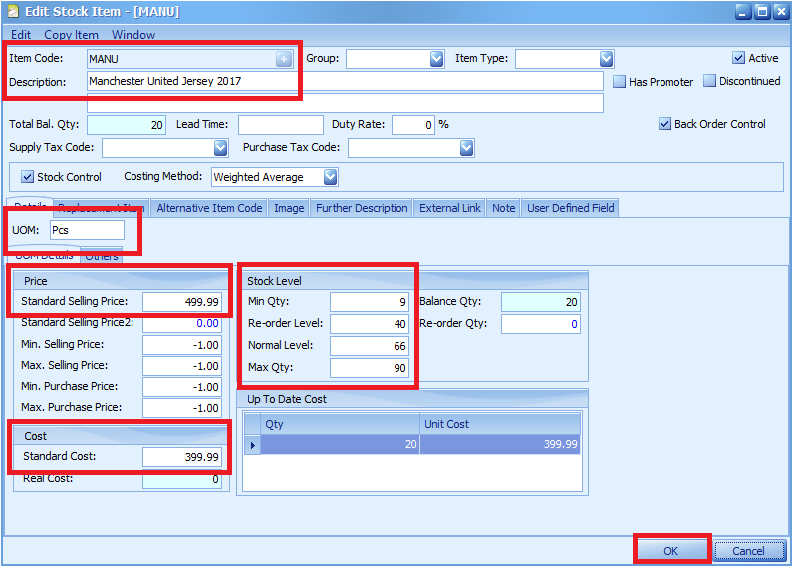
vi. It will direct you to main page.
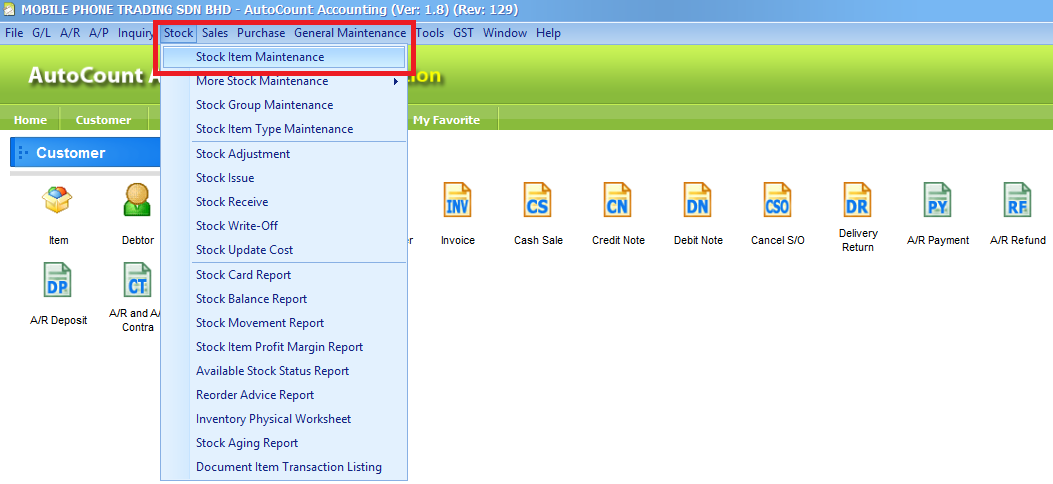
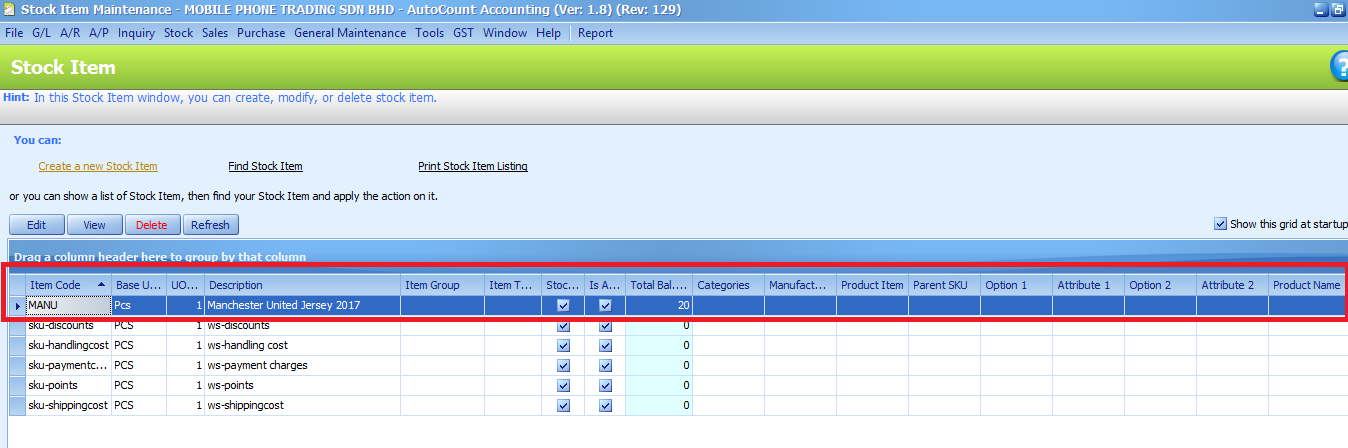
vii. Go to Stock > Stock Item Maintenance. Here you can create, modify and delete stock item.
viii. It will show your Product Item description.
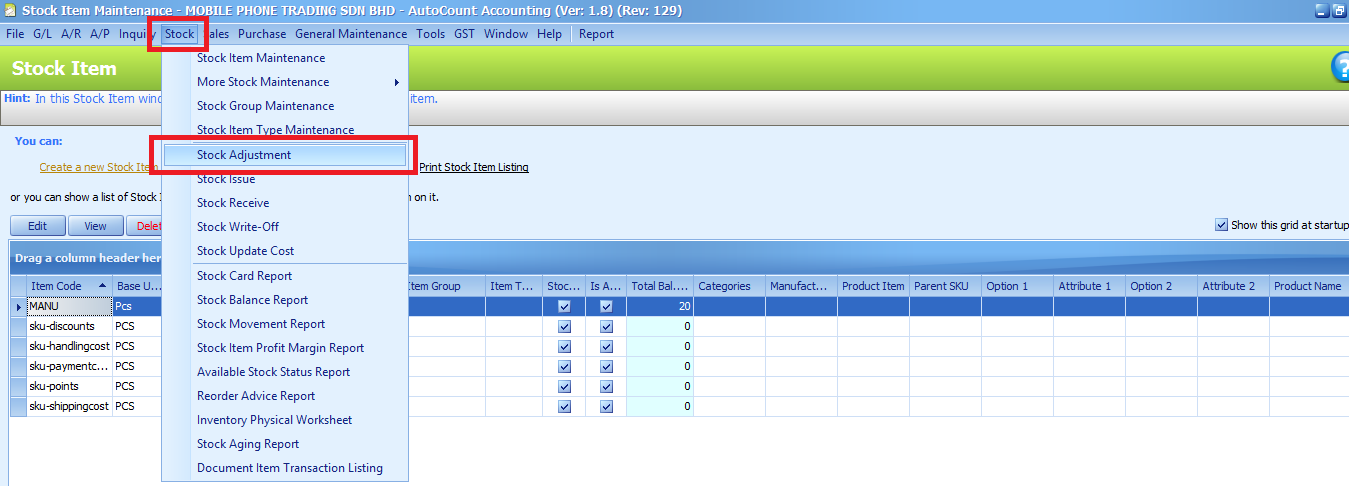
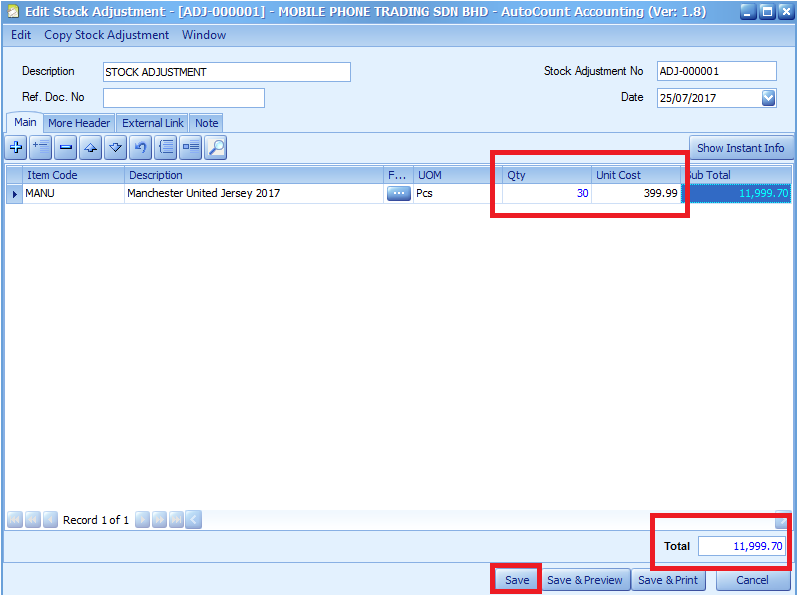
ix. To modify Total Balance Quantity, go to Stock AdjustmentStock > Stock Adjustment. Stock Adjustment window is where you create, modify or create stock adjustment.
x. Double click on your product item.
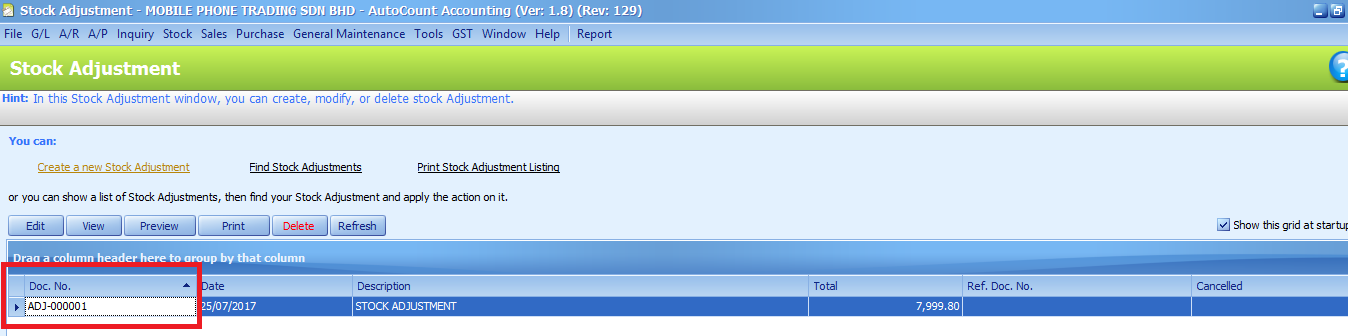
xi. Insert your quantity. The Total show will the (quantity * unit cost) per product item. Then click Save.
xii. Go to webShaper AutoCount Sync. Click Sync.
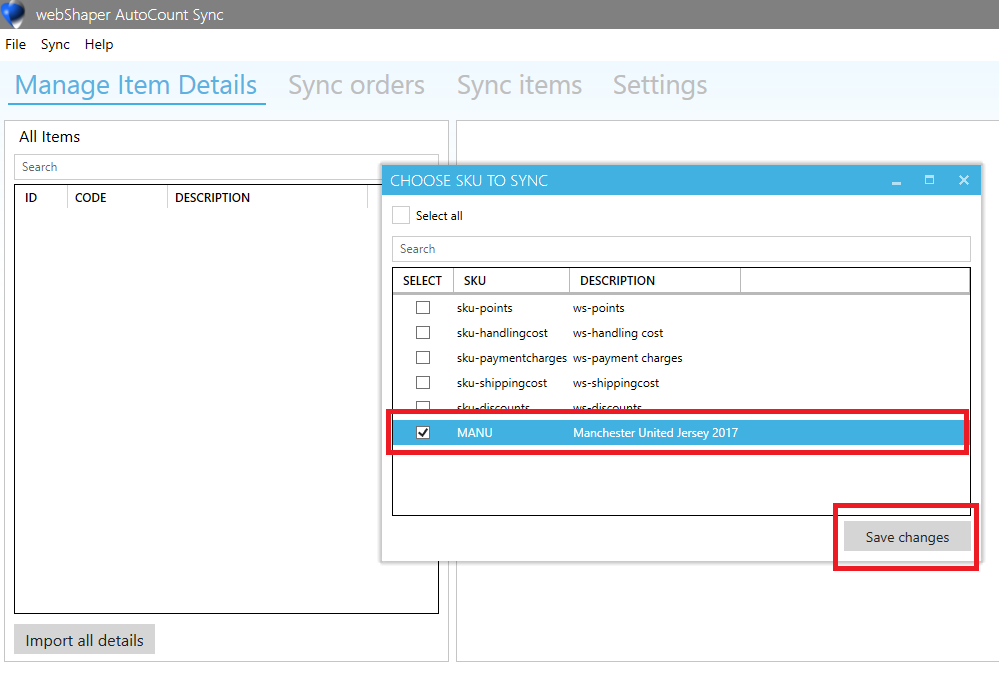
xiii. Click Choose Sync Items.
xiv. Select by ticking your product to sync into webShaper.
xv. Click Save Changes.
Step 2: Manage Item Details
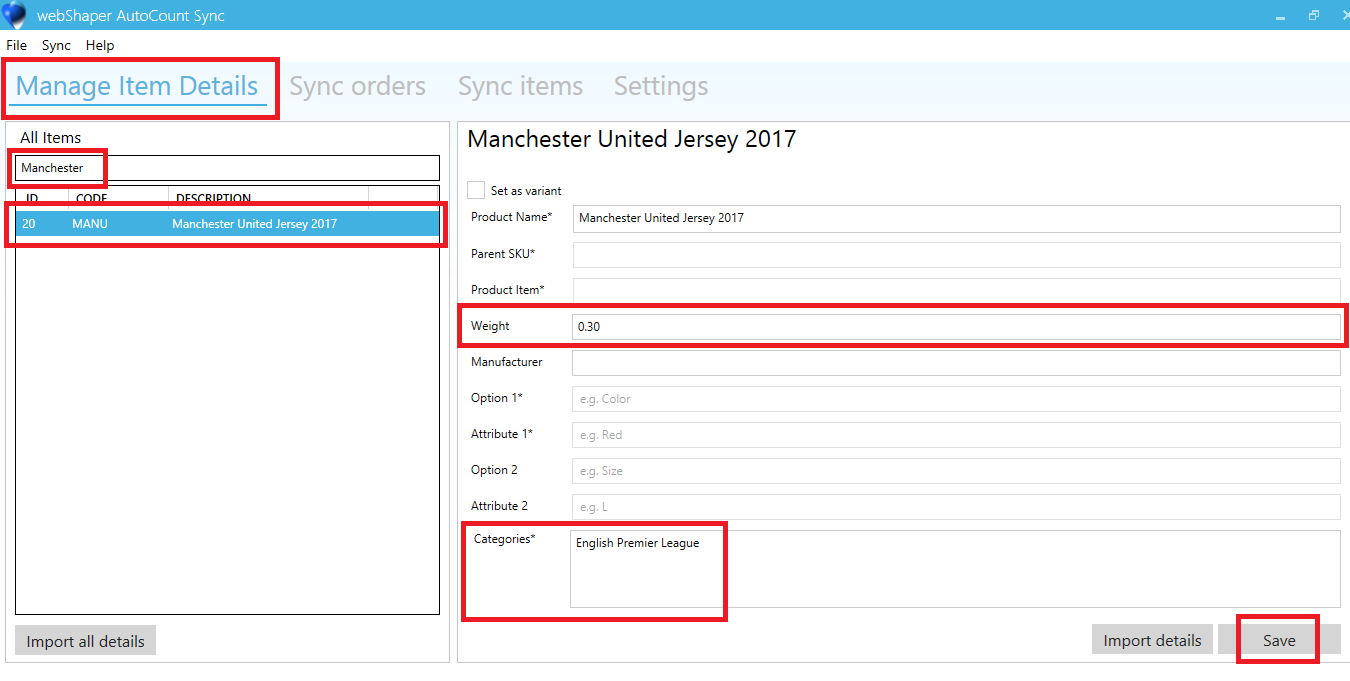
1. Click Manage item details.
2. Search your product.
3. Click on your product.
4. Make sure to filled in the important fields:
i. Single Item:
- Product Name
- Weight
- Categories
ii. Variation: (First you need to tick Set as variant button),
- Product Name
- Parent SKU
- Product Item (Group Name)
- Weight
- Option 1; Option 2 (Optional)
- Attribute 1; Attribute 2 (Optional)
- Categories

5. Click Save.
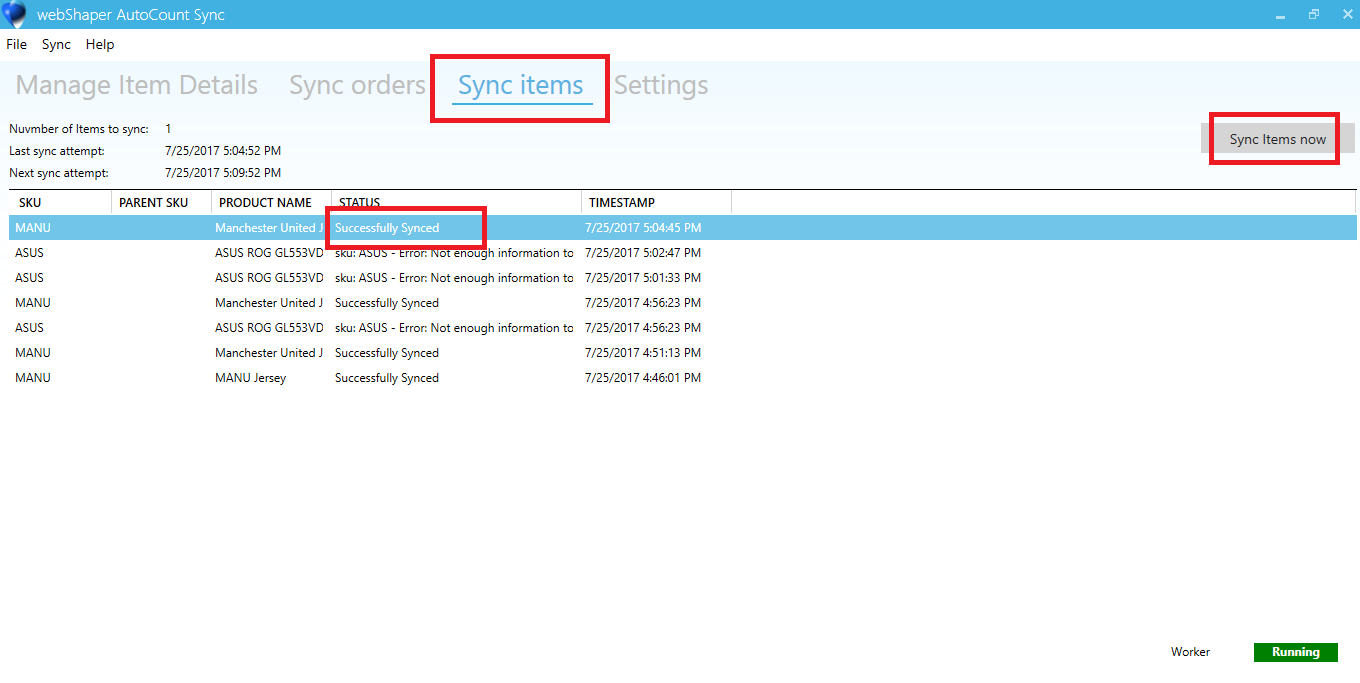
Step 3: Stock Sync
1. Click Sync items.
2. Click Sync Items now.
3. It will show that your product is Successfully Synced to webShaper.
4. Go to your webShaper store control panel.
5. Click Product.
6. Find your sync product from AutoCount Accounting and click on your product.
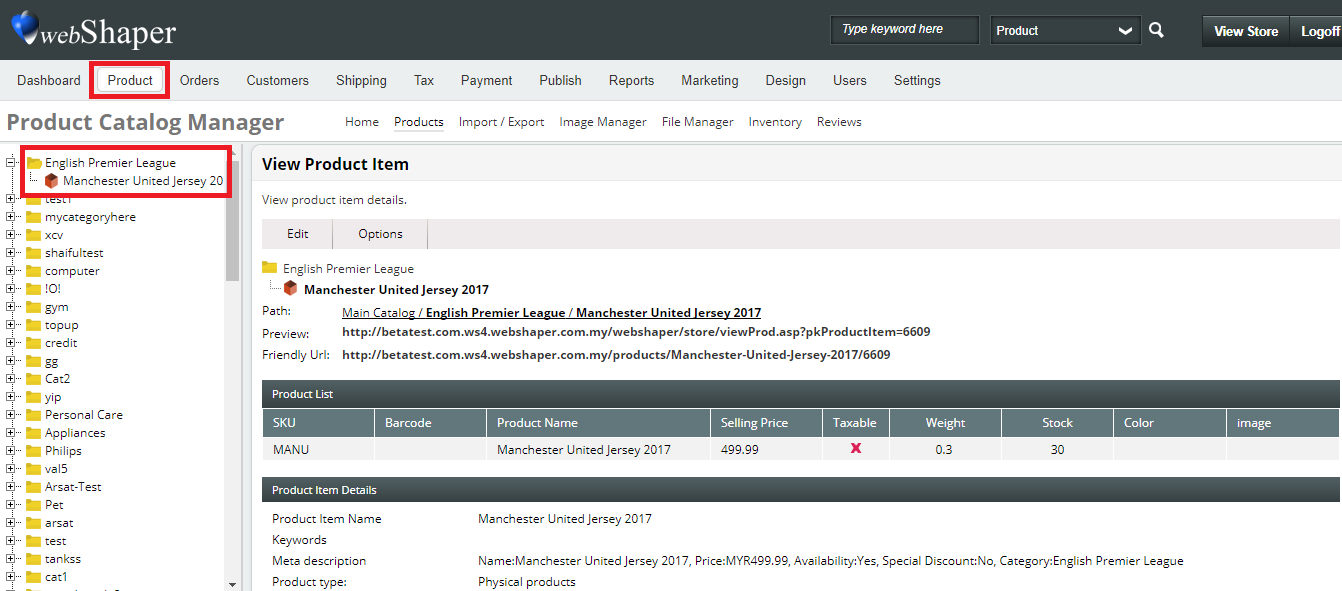
7. Now you can see that your product with all the details are successfully synced into webShaper and make sure all your syncing products have Processed status to proceed.
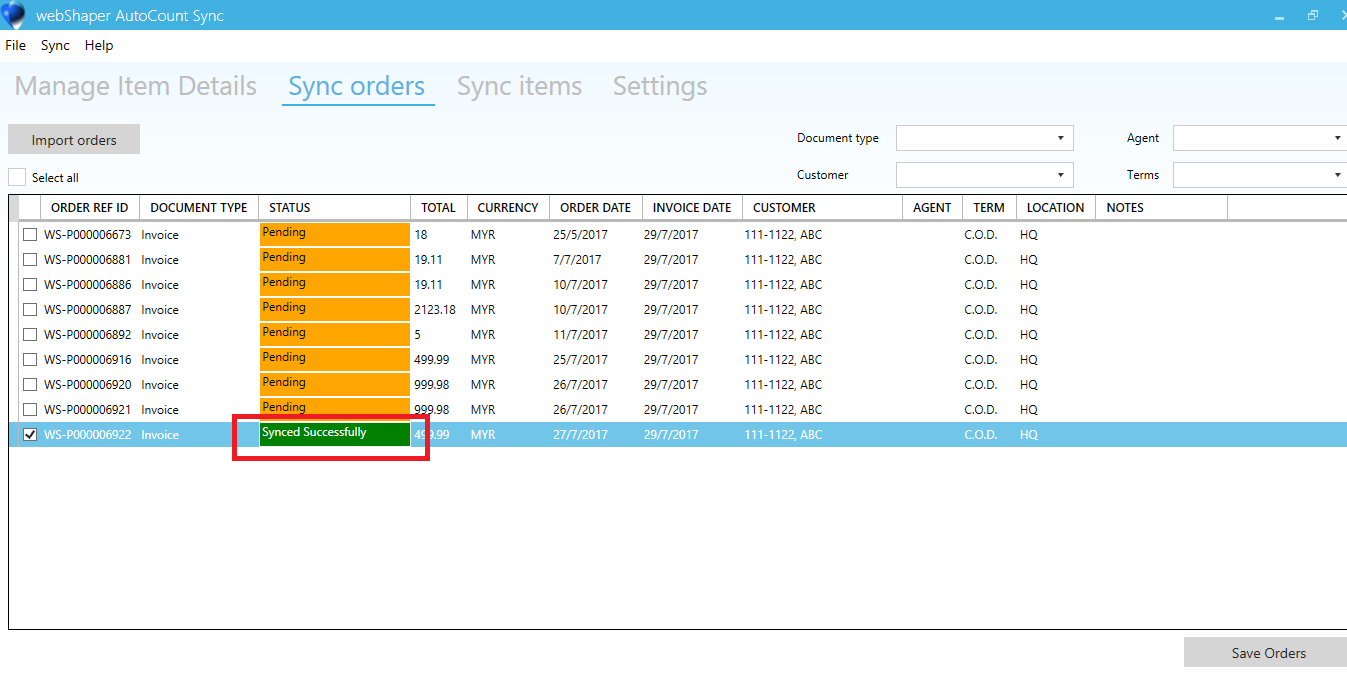
Step 4: Order Sync
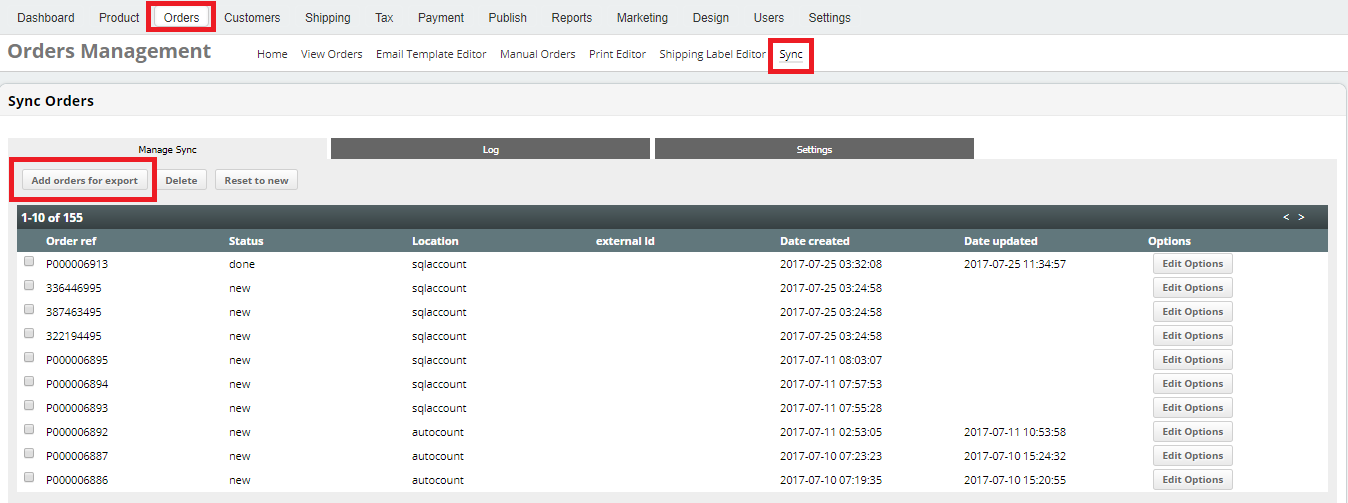
1. On Orders section, click Sync.
2. Click Add orders for export.
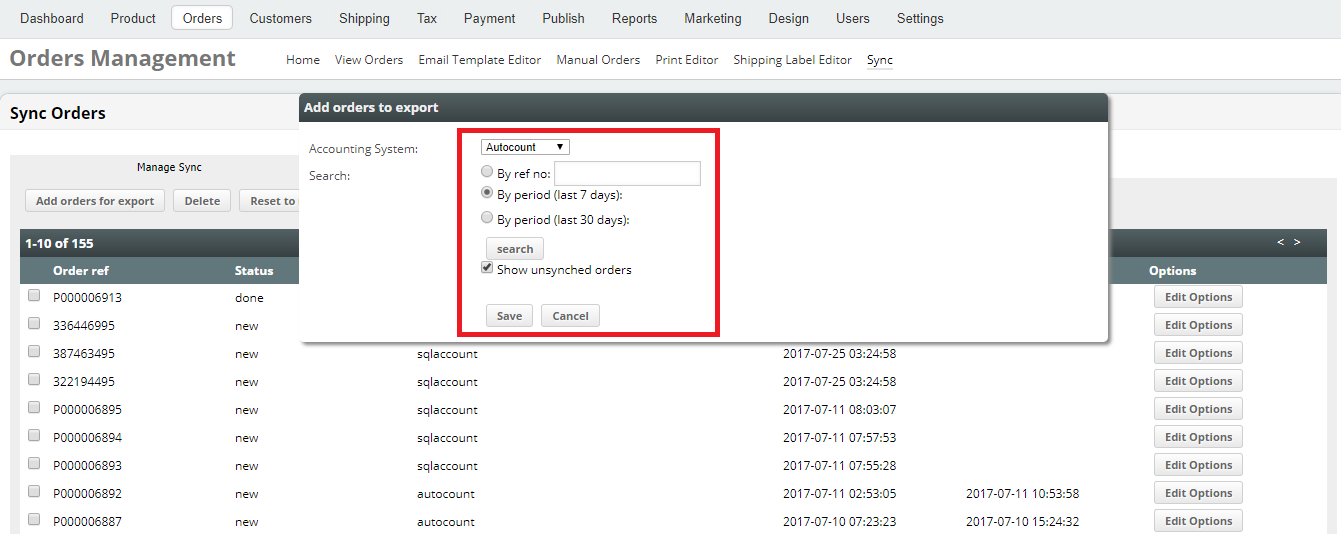
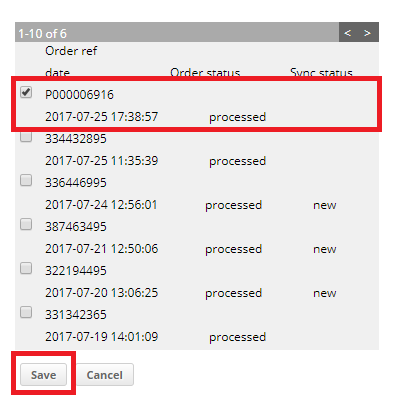
3. On Accounting System, choose Autocount. Tick By period (last 7 days). Click Search.
4. Tick your order reference. Make sure your status is processed.
5. Click Save.
6. Then you can see that your order is added on Manage Sync section.

7. Go to webShaper AutoCount Accounting Sync.
8. Click Sync Orders.
9. Click Import Orders.
10. In this section, you can change the Document type, either it is Cash Sales or Invoice.
And you need to insert a Customer.
11. Click Save Orders.
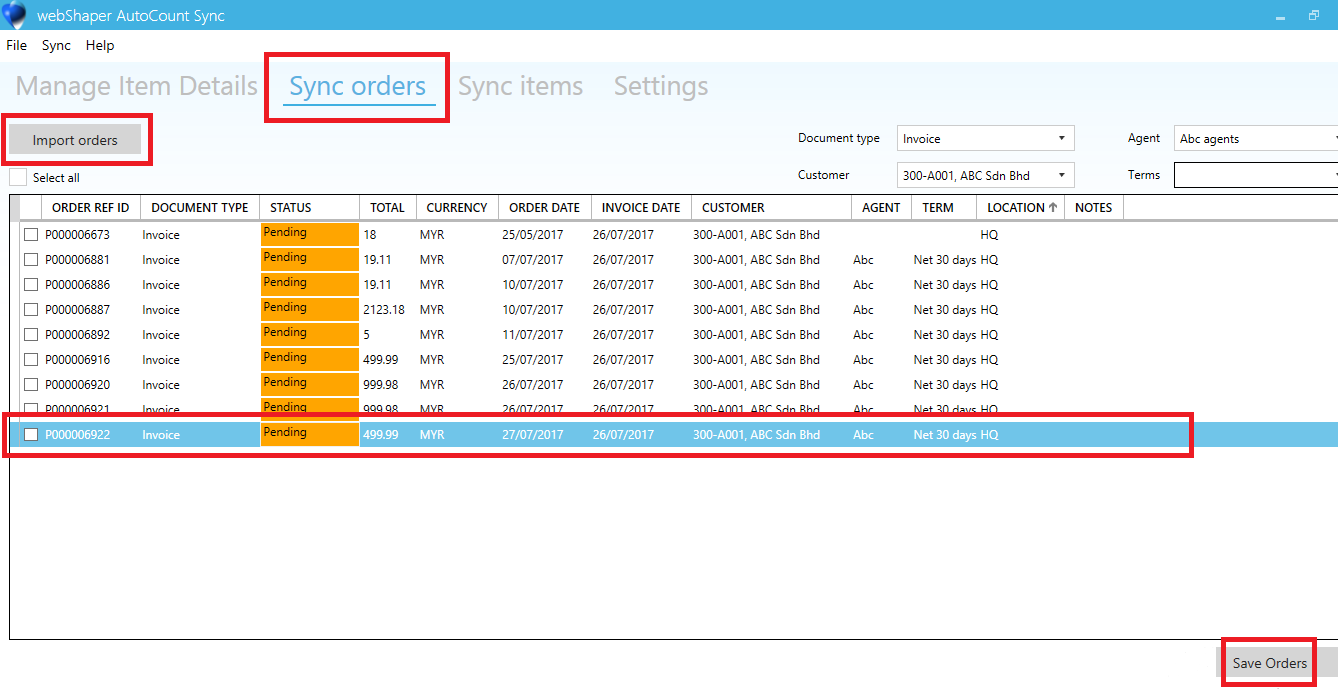
12. Then you can see your order status change from Pending to Synced Successfully.